e-PDF To Image Converter

How to convert PDF to image(JPG/BMP/TIF/GIF) with command line

e-PDF to Image Converter is a command line tool helping you convert  PDF to image(JPG/BMP/TIF/GIF) on Windows platforms.

e-PDF to Image Converter is a program based on Windows platform, which allows the batch converting of large numbers of PDF files at the same time. e-PDF to Image Converter can be integrated into your own software applications or Web-server applications to convert PDF files to image files (JPG, JPEG, TIFF, BMP, PNG, GIF, TGA, PCX, PNM, RAS, PBM, etc.).

Please do not hesitate to try e-PDF to Image Converter for its function, and then, you can use it for following steps to realize converting PDF file to image file(JPG/BMP/TIF/GIF) with command line:

Step1. Open Command Prompt window

Command Prompt is running environment of command line in Windows systems, so you need to run cmd.exe to open it for later command line process. After opening it, you can continue next step.

Step2. Convert PDF file to image(JPG/BMP/TIF/GIF) with command line

Please refer to following command line example to accomplish your own process:

pdf2img.exe C:\in.pdf C:\out.tif

pdf2img.exe C:\in.pdf C:\out.gif

pdf2img.exe C:\in.pdf C:\out.jpg

pdf2img.exe C:\in.pdf C:\out.bmp

where:

  • pdf2img.exe: call executive file “pdf2img.exe”
  • C:\in.pdf: specify source PDF file
  • C:\out.tif/gif/jpg/bmp: specify output image file of TIF/GIF/JPG/BMP

When you finish typing like above, please click enter in Command Prompt window, and then, e-PDF to Image Converter helps you convert PDF file to image(JPG/BMP/TIF/GIF) with command line directly. Then, targeting image files could be added into destination folder directly.

Is your conversion smooth in your computer? Anyway, e-PDF to Image Converter supports editing image properties with command line and parameters, and moreover, if you are interested in full version software, which brings you no-watermark image files, please purchase e-PDF to Image Converter. Thank you for reading this article with me!

e-PDF Document Converter

How to convert PDF to specific resolution/DPI image

This article aims at illustrating how to use e-PDF Document Converter to convert PDF to image with specific resolution/DPI on Windows platforms.

First of all, please install trial version software with this way:

Then, just follow steps below to realize conversion from PDF file to specific resolution/DPI image in Windows systems:

Step1. Run software and Add source PDF file

After installation, just double-click shortcut to open its GUI interface, and then, click Add File(s) on GUI interface > select right PDF file and click Open, and then, you will see selected PDF path located in processing form on GUI interface, which is as shown as following snapshot implies:

Add PDF file to GUI interface of VeryPDF PDF to HTML Converter Or it is more convenient to drag and drop PDF file into processing table directly, for this tool supports this functions.

Moreover, to get all PDF files added for conversion one time, you can also click File on toolbar > select Add Directories on dropdown list > select folder containing PDF files > click Ok directly so that all PDF files in that folder can display as paths in that processing table.

Step2. Set targeting format and Edit specific resolution/DPI for image in advance

After adding source file, just click Setting on GUI interface, and then, click tab Base Setting on pop panel > select one of image file extension, e.g., .tif on dropdown list Output format directly, then, targeting format, which is TIFF, is already set successfully.

The following snapshot shows you more details about setting PDF as targeting file type:

Set PDF as targeting format during converting PDF to HTML with GUI interface

However, it is not complete about setting on this panel. Then, please click tab Save Image Mode directly > select one of image resolutions on pop list Image Resolution directly in order to set specific image resolution, for instance, you can select 400x400 DPI there so that it could be targeting setting on later image files. Or, to set image resolution more specific, just input customized one in edit-box Image Resolution.

The following snapshot could tell you more about operation on setting specific image resolution:

Set specific resolution/DPI for image during converting PDF to image with GUI interface

Finally, please click OK so that your setting here could be saved and this panel can be close directly.

Step3. Set destination folder and Convert PDF file to specific resolution/DPI image with GUI interface

After all prepared work is done like above, one click on Start helps you with targeting folder and conversion:

In pop dialog box program offers you, please select one folder as destination folder and click OK, and later on, along with ending of process, your image files with specific resolution/DPI can be located in that folder automatically.

Anyway, my process from PDF to specific resolution/DPI image files is done well in great quality and speed, what about yours? And of course, after smoothly or tough conversion of yours is finished, if you have any questions on e-PDF Document Converter or encounter some problems during conversion, welcome to leave your comments here, it is certain that our support will help you as soon as possible. And finally, to use software without limit, just purchase e-PDF Document Converter directly.

e-PDF Document Converter

How to convert Word/Excel/PowerPoint/PDF to color/black and white image with command line

This article enables you to know how to use e-PDF Document Converter to convert Word to image, Excel to image, PowerPoint to image or PDF to image of color/black and white

e-PDF Document Converter is a professional tool enabling you to convert Word/PowerPoint/Excel/PDF file to image files through GUI and command line flexibly. And in the following paragraphs, you will know how to use command line to realize our related process instantly and flexibly:

Step1. Download and Install

First, just download installer of e-PDF Document Converter, and then, double-click this installer to install software in your computer, most importantly, along with GUI version installed, command line version is installed in your computer directly, whose executive file “doc2pdf.exe” that could be called for later process, is located in installation folder.

Step2. Open Command Prompt

Command line needs a running environment, so for Windows platforms, we need to run cmd.exe to open Command Prompt directly. After it pops on screen, you can follow next steps to realize conversion.

Step3. Input command line and parameters to convert Word/PDF/PowerPoint/Excel file to black and white/color image files

In opened Command Prompt, you can refer to following usage and command line examples to accomplish your process:

Usage:

doc2pdf [options] <-i Document Files> [-o Output]

CMD examples

doc2pdf.exe -i C:\in.pdf -o C:\out.tif -b 1

doc2pdf.exe -i C:\in.doc -o C:\out.jpg -b 24

where:

doc2pdf.exe: call executive file “doc2pdf.exe” to run software

-i C:\in.pdf/doc: specify source PDF file or Word file, also, file type could be PowerPoint, Excel, etc. supported source formats

-o C:\out.tif/jpg: specify targeting TIF or JPG file

-b <int>: specify color type for output file

-b 1: output black and white image file

-b 24: output True Colors image file

Finally, you can click enter in Command Prompt to make e-PDF Document Converter to convert PDF/PowerPoint/Word/Excel file to color/black and white image files. Then, targeting image files can be added into specific destination folder directly.

When you finish conversion from Word/Excel/PDF/PowerPoint file to black and white/color image files, if you want to remove watermarks from image files, welcome to use full version of e-PDF Document Converter directly.

e-PDF Document Converter

How to batch convert PowerPoint/Excel/Word to password protected PDF

It is simple to use e-PDF Document Converter to batch convert PowerPoint to PDF, Excel to PDF or Word to PDF, with passwords on Windows platforms.

e-PDF Document Converter is a software product that converts MS Office 97/2000/XP/2003, WordPerfect, HTML, AutoCAD DWG, PostScript, EPS, PDF, MS Visio and many other document types to PDF, PostScript, EPS, JPEG, TIFF, PNG, PCX and BMP etc formats. Through GUI interface and command line, Windows users can easily and instantly accomplish supported conversions.

If my description arises your interest to know more details about related batch conversion, please keep reading this article:

Step1. Run software and add source PowerPoint/Excel/Word files

After you obtain trial version of e-PDF Document Converter, please double-click software shortcut to open GUI interface, then, click Add File(s) on GUI interface > select source PowerPoint/Excel/Word files and click Open in dialog box, finally, selected files can be shown in processing form, which is as shown as what following picture shows you:

Add source files into GUI interface of e-PDF Document Converter To quickly add source files, just drag and drop supported files into this processing form directly, which is easiest way to operate.

Step2. Set targeting format and edit PDF passwords, encryption level and permission

Then, please click Setting on GUI interface, and then, you can do the followings to set targeting format and edit PDF passwords with encryption:

  • Click tab Base Setting on pop panel > select .pdf on dropdown list Output format, and so, it is complete to set PDF as targeting file type

Here is related snapshot about how to set PDF as targeting format:

Set targeting format as PDF during batch converting PowerPoint/Excel/Word to PDF with GUI

  • Click tab PDF Security on pop panel > click check-box Encrypt PDF to activate radios and edit-boxes, etc. below it, then, you can continue to type open password, master password in edit-boxes of theirs; to set encryption level, just select one radio below Encryption Level; to edit permission for master password, just click check-boxes below Permission

Here is related snapshot about how to set PDF passwords with encryption level and permission:

Set PDF passwords and encryption during batch converting PowerPoint/Excel/Word to PDF with GUI Finally, to save setting and close panel, just click OK.

Step3. Batch convert PowerPoint/Excel/Word files to password protected PDF files

After all prepared work is done, click Start on GUI interface, after program provides dialog box, just set targeting folder there and click Save, and finally, your password protected PDF files could be added into destination folder.

Is it smooth for you to batch convert PowerPoint/Word/Excel file to password protected PDF file with GUI interface of e-PDF Document Converter? Then, to remove watermarks on produced PDF files for good, please choose full version of e-PDF Document Converter.

e-PDF Document Converter

How to convert Word to PDF and set PDF information

This article would like to show you how to use e-PDF Document Converter to convert Word to PDF and set PDF information with GUI interface in Windows platforms.

It is simple to complete operations on GUI interface of this application, whose information could be found at its homepage. And if you need to know more details here, just keep reading this article:

Step1. Download and Install

Please download installer of e-PDF Document Converter to your computer, and to install this application, just double-click this installer and follow setup wizard to install it in your computer successfully.

Step2. Run software and Add Word files

After installation, double-click shortcut to open its GUI interface, and then, please add Word files through drag and drop of source Word files, then, their directories show in processing form, or you can click Add File(s) on GUI interface > select Word files and click Open in pop dialog box, whose result is the same as drag and drop.

Here is related picture for you to refer to:

Add Word files for converting Word to PDF and set PDF information with GUI interfaceStep3. Set targeting format and Edit PDF information

After adding, click Setting on GUI interface, and you can realize format setting and PDF information editing:

  • Click tab Base Setting on pop panel
  • Click .pdf on dropdown list Output format

It is finished to set PDF as targeting format, and here is related snapshot below:

Set PDF as targeting format during converting Word to PDF with GUI interface

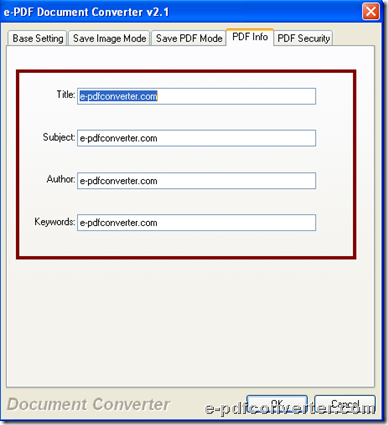
  • Click tab PDF Info on pop panel
  • Input PDF title, subject, author, keywords in related edit-boxes

It is complete to set PDF information, and here is related snapshot below:

Edit PDF information during converting Word to PDF with GUI interface

Finally, to save setting here, just click OK.

Step4. Convert Word files to PDF files with GUI interface

After setting, program takes you back to GUI interface, and then, please click Start to set targeting folder through selecting it and clicking Save in pop dialog box, and then, after several windows pops on screen, and a few seconds, please check destination folder, where you can find targeting PDF file with specific PDF information.

Please do not hesitate to use full version of e-PDF Document Converter to convert Word file to PDF file, if you want to remove watermarks on targeting PDF files.